Making Peanut Butter Without an Electric Machine


peanut-butter-3

As far back as I can remember, we’ve always had peanut butter at home. Making it at home has been the norm and we’ve always never used an electric appliance. Now that I have my own young family, why not make mine too? It’s very easy and the results are always good every time.

Why peanut butter? For obvious reasons it is very nutritious and delicious. So without taking this any further let’s make some peanut butter 🙂

Things you need

  • Frying pan
  • Pestle and mortar
  • A spoon
  • A table knife
  • An empty jar

Ingredients

  • Peanuts
  • Salt (optional)
  • Vegetable cooking oil preferably sunflower oil

Start by roasting peanuts on a pan on medium flame. Be careful not to overcook them as by doing that will make the butter be with a burnt flavour. When cooked, remove from the flame and set the pan aside to completely cool down to room temperature. As the nuts cool you will hear the crackling sound 🙂 an indication that they are still cooking. Also enjoy the nice aroma of the nuts filling your house.

After the nuts have cooled, transfer them into your mortar and pounding softly grind the peanuts into a paste. It took me less than 20 min to reach my desired medium because I like my peanut butter a bit coarse. If you like yours smooth, continue pestling!

Next transfer the paste into a clean jar. Add a pinch of salt to season. If you don’t like salt you can leave it out, no problem. But you also should know that a little salt is important as it keeps the butter from turning rancid or going bad faster. In the jar add a few drops of vegetable cooking oil and mix the butter into a consistency that you like. I like mine not too runny so a few drops does the trick.

Finally, you have your very own homemade peanut butter without the use of an electric machine. Enjoy!


Leave a comment

Filed under coconut oil, Jam, peanut butter, peanuts

Man Knit?

Knitting? I like it! I don’t know why I started it. It was just an impulse really. I remember asking why there aren’t many doing it any more, both sexes included. Back in the day when growing up, it was common seeing one knit or crochet. You wouldn’t miss a ball of yarn in a home. Local shopkeepers were even selling yarn! It was normal seeing our mother’s knit us sweaters, socks and hats. A more common sight was seeing our mothers crotchet away for hours those colorful furniture drapes with lovely patterns. It was nice.

So that got me thinking, why not learn to knit? That was October last year. I got myself a pair of standard knitting needles and some yarn from markiti (an old local market), studied a few you-tube videos and within no time I was knitting a scarf. Actually it was not so hard but I knew I was getting better as I carried on.

scarf

scarf

Why Knit?

Knitting is good and I like it very much. I find it very enjoyable. It really relaxes the mind. It’s not like I have a lot of free time on my hands to kill, No! No! I just feel that everybody needs something that he can do for himself in his pastime, In his alone time, and mine is sometimes knitting.

I particularly like knitting at this one place called zing, a restaurant in my neighbourhood. The place is quite private, which is good for knitting. The other interesting thing i have noted is that this activity is really a conversation starter, which is good. It makes people smile especially when they see it’s a man doing it, and if they have knitting knowledge, in no time you will both be having a happy talk about wool.

Coincidence?

When my mother learnt about my little pastime, she told me that my grandfather was very good at knitting. I really did not know this before I took on to knitting. He was so good at it that he was making us little sweaters when we were toddlers using porcupine quills as knitting needles and making yarn from scratch by spinning it from wool.

The knowledge that it’s not a gender thing was a good feeling, not that I was too concerned anyway. Men were knitting long before I started 🙂 My wife doesn’t mind me knitting, she finds it quite amusing seeing me do it. She’s used to it now 😀 Planning to make her something warm in the near future.

Leave a comment

Filed under knitting, Uncategorized

Kungu Manga Mystery

The Mombasa spice “marikiti” off Digo Road is a fantastic little place. I love everything that is located along this narrow street. From the fresh, breezy streets with laid back shopkeepers in their spice shops, hawkers and shoppers to the large century old colonial market. I love everything that happens around the market. You can sense the history of the old place.

I always look forward going to this place, and I had to because my spice supplies were running on the low. Needed the usual; cinnamon, cardamon, black pepper, dried chilli, ginger, fennel seeds, fenugreek seeds, turmeric, cloves etc.

kungu manga

Kungu manga was the least of the spices I was expecting to buy. I saw it by chance in a little spice shop I was visiting for the first time. Didn’t know what it was as it looked like any other nut to me. My inquisitiveness caught the shop attendant’s interest. I was lucky he was a cheerful happy man, he made my learning fun.

I learnt that kungu manga is also called the nutmeg in English. All along, what I always thought was kungu manga was actually something else 😀 the pomegranate, Please excuse my ignorance. But I am happy I now know.

In kenya, and I think the whole of the East African coast, the kungu manga is quite famous, mainly because of its aphrodisiac qualities 🙂 Is it a myth, I really don’t know. By gathering from my Swahili shopkeeper friend, the little oval nut is really all of what is thought of it and more. It is also a proven hallucinogen, that I now know. I was a little bit surprised as to how pricey the little nut is. They sell it at 25 shillings each!

How it’s used

Kungu manga is a favorite of men and women, mostly men wanting to enhance their sex stamina 🙂 Its main use is on food as a spice, especially on pilau. I got these tips from the man at the spice shop. A man expecting some action had to take the kungu manga some four hours before, and to maximize the effect, they add it on coffee.

Preparing it

The Kungu manga has a hard thin coffee brown cot, crack that open. Inside, you will find a nut like substance. Using a pestle and mortar, grind the nutmeg into a powder and use it alongside your other spices like you would do when cooking your pilau. One thing I noted is that it has a pungent spicy aroma when grinding. For greater action add the freshly ground powder to your coffee and enjoy 🙂

One thing though, I have not tried it yet on food or coffee. When I finally gather enough courage to try, I’ll tell.


5 Comments

Filed under kungu manga, nutmeg, spices

Cooking an Octopus at Home

I’ve always wanted to cook an octopus at home, so this weekend I went ahead and got one at the local fish market. Living in Mombasa makes it easier to finding fresh “pweza”. I got mine at the Likoni ferry fish shops. The best time to finding fresh octopus at the market is from10A.m to noon. That’s when the tides are low and fishermen are able to find them easily from the coral.

1The octopus is not an uncommon dish at the coast. In Likoni and the South coast, this special delicacy is prepared in many homes and a few roadside restaurants. But still, you will find that many people are uninterested in it or have no idea where to get it. How to cook it is also a problem to many.

Properly cooked octopus is well known for its delicious tender texture, it is also a very nutritious food, with a high source of vitamins and minerals! It is a lean protein source and low in fat.

Preparing it!

I asked the fish monger about this and he was happy to prepare and wash the octopus for me. When I got home, I did not like the head so I sliced it off, removed the beak and gave the “pweza” an extra cleaning with running tap water.

Cooking the Octopus

I was lucky I had a cheerful fish monger who was glad to share a few recipes on how to cook my octopus. What I gathered from him and from reading other sources is that you must tenderize the meat first before the cooking process begins. A way of doing this would be by beating it with a kitchen mallet (whatever you can find) or boiling it. I chose to boil it.

Using a sufuria large enough to submerge the octopus, I let the water come to a boil with enough salt. Then I dipped the octopus in the boiling water for 10 sec and removed it out for 3 seconds. I did this 3 times. This repeated hot and cold blanching process was very important as it tenderized the meat. Next, I placed the octopus in the boiling water (including my seasoning of ginger and garlic) and let it boil for 50min.

Cooking the octopus is very easy. If you have cooked beef, you should have no problem cooking “pweza”. The process is almost identical.

When I was sure that the octopus had cooked to my liking, I removed it from the boiling water and let it cool a bit. I then cut it to manageable sizes just as you would do when cooking beef. I had chosen to do a stir fry (from this point on you can choose to cook how you want your octopus to be; roast, stew, soup?)

I poured a little vegetable oil on the pan and let the oil heat up. I added the octopus and fried it to a brown. At this point the aroma filling the kitchen was irresistible 🙂 Next, I added the onions and continued frying till they were soft. I added green hot chilli to taste, green capsicum and served.

Delissssss! 🙂

Leave a comment

Filed under cook an octopus, kamba nane, nyama ya pweza, octopus, pweza, Uncategorized

Making Coconut Oil at Home, It’s Super Simple

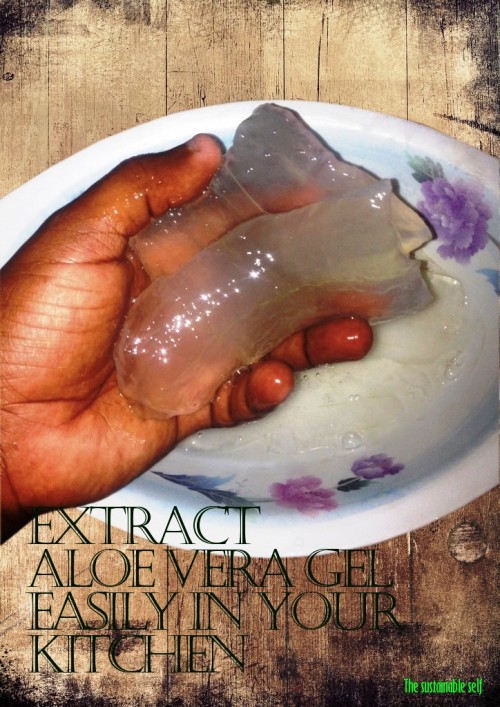
Today I want to show you how I make coconut oil at home without the use of expensive presses and machines. We will use the basic utensils that every home has. It is a very easy technique that has always been used for generations by the Digo and many other communities along the East African coast.

coconut


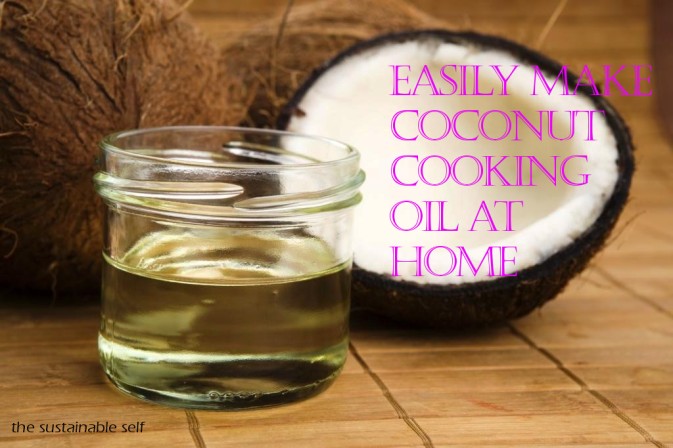
Coconut oil is certainly one of the “super” oils. Its well documented health benefits and uses are countless. From cooking with it to use as medicine, from application on skin/ hair to use in making amazing cosmetic products. It is one of the few oils with anti-microbial qualities! and for above reasons and more, it is an oil loved by all humanity.

My interest in the coconut cooking oil has for many times led me to the supermarkets and shops. A simple survey of cooking oils on any shop’s shelf always surprises me. Almost all of the oil is palm oil. Do you know that the raw palm oil used by the many edible oil manufacturers is exclusively imported all the way from the far east countries? This obviously means that a majority of homes in Kenya use palm oil for cooking.

I certainly think that in coconut oil, we have a better alternative. First, we are a lucky country because the nut is in plenty at the coast. With a few coconuts and a little time, making healthy cooking oil is really easy. The other thing is; have you had a look at the prices of coconut cooking oil in the supermarkets? They are shockingly high. A litre of the oil goes for an average of KShs 1000- a good reason for you to make your own.

Alright, let’s get started

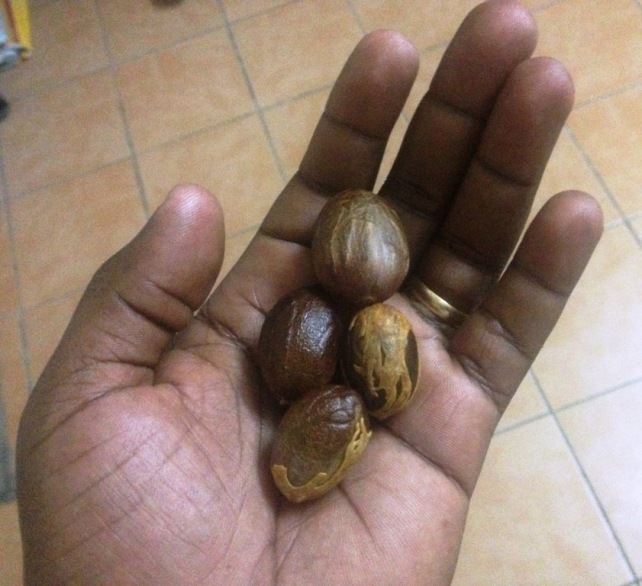
You will need to get mature coconuts. The mature they are, the more oil you will get. At the coast, in markets. Our mothers have always easily identified and selected the better mature coconuts from the rest. The ones that will produce more heavy coconut milk (tui nzito). They do this easily by placing the coconut closer to the ear and giving it a shake. The ones with less “swoosh” means that they have less coconut water and hence more meat in them (more meat means more coconut milk). Give this a try and more often than most you will get it right too.

Break the coconut open with a panga, hammer, stone or by just dropping it with force on a hard floor 😀 Whichever way you break it open, don’t throw out the nutritious coconut water that “flows” from the nuts. Collect the refreshing drink in a cup and enjoy.

One thing to point out is that you will need to start the coconut oil making process in the evening, because you actually have to let the milk sit out overnight. After breaking open the coconut, you will need to grate it. You can do this by using some form of grater or simply the “mbuzi”, then extract the “tui” using a “kifumbu” like the coastal people do.

If you don’t have these, no worries! You can still use a regular blender. Using a knife, place the coconut flesh that you have broken down into small cubes in the blender. Add a little water and grind to a smooth paste. Next, pour the contents of the blender into a large bowl and use your clean hands to squeeze the milk out of the shredded coconut.

Transfer the contents of the bowl into a large kitchen sieve and squeeze out the milk. Add a little water if necessary and repeat the process until you are satisfied that all the coconut milk has been extracted. In a larger bowl, leave the coconut milk overnight (8- 12 hours) at room temperature, covered of course, so that no insects or anything else comes into contact with it.

The next day, you will find that the coconut cream has separated from the coconut water. The white curd will be floating on top of the water. Actually what happens is that the milk naturally ferments, which is a good thing as this allows for the clear and easy separation of the cream from the water.

Using a large spoon, scoop off the top cream layer into a “sufuria” or cooking pot. Only skim out the curd into the “sufuria”. The less water you will have in your “sufuria” the less time it will take to boil it out. Throw out the remaining water in the bowl, you don’t need it.

Place the cooking pot with the cream on a stove and boil it, but be careful not to spill it out due to high heat. When it reaches a boil reduce heat to a medium. Our aim is in boiling out all the water, then separate the curd from the oils. Let it boil on medium heat for about 40 min until all the water evaporates and the oil rises to the top.

Once you are sure that all the water has been cooked out of the oil (usually at the 40 min mark), carefully transfer the oil into a clean stainless steel container or anything that will not melt under the high oil heat. Finally when it has cooled, transfer into your clean, dry, cooking oil jar.

On average, usually 2 large coconuts get me about a cup of good coconut oil (about 250ml). You can now enjoy your cooking as you will be having fresh cooking oil that you have made yourself 🙂 You are entitled to a sense of achievement. You just made an oil that you can use on your skin (hair) or baby’s as well.
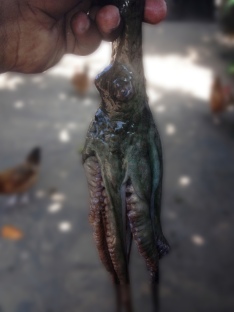


4 Comments

Filed under coconut, coconut cooking oil, coconut oil, Homemade Toothpaste, Soap, Soapmaking

How To Easily Extract Aloe Vera gel In Your Kitchen

Am sure we’ve all heard a lot about the Aloe Vera plant, a beautiful herb with amazing medicinal and health benefits. I also assume that you are familiar with its many fine qualities, especially to the skin ( to sensitive skin, irritated skin, dry skin, burns etc). For these reasons and more, aloe vera gel is the perfect natural ingredient for making luxurious skin and hair products (I will be making soap with it)

aloegel3

The other best reason for using this lovely plant is that it’s available in plenty in almost all areas of Kenya, especially the arid and semi arid places. Astonishingly, It grows as a weed in most places. Am always in awe of the resources our country is blessed with.

Without yapping too much 🙂 lets get on with extracting our aloe vera

Getting the gel from the leaf is a very simple and fast procedure. I start by spreading a few newspapers on the kitchen table to make cleaning easier afterwards. My reason for extracting the gel was for soap-making. I am sure you have an idea or two on what you will do with yours. One large leaf was sufficiently enough for me.

After harvesting the leaf, let it sit undisturbed for up to 20 min on a cup for the yellow substance (resin) to drip out. The yellow resin has a bitter taste and is irritating to the skin so discard that.

Using a knife, trim off the thorny edges. Then gently peel off the top layer of the leaf like you do when filleting a fish. Finally, using a spoon, scoop out the clear inner gel. Just extract what you will use because the gel is very perishable.

You now have your very own fresh aloe vera gel that you have extracted at home. Whatever your use for it will be, Enjoy!

Leave a comment

Filed under aloe vera, aloe vera gel, Soap, Soapmaking

How to Easily Ferment Vegetables at Home

Making fermented vegetables in your kitchen is so easy, I’ve done it a couple of times now and it only takes me a few minutes, I am going to show you how simple it is. By now am sure you are aware of the healthful benefits of having this fantastic dish as a part of your meal.

Generally, fermentation has traditionally been used by cultures all over the world as a means of preserving food, in our case vegetables. In addition to preserving the vegetables, it enhances their nutritional value, makes them more digestible and extremely nutritious 🙂 It also populates them with living bacteria that goes on to live in our digestive system enabling us to effectively digest all the other food that we eat.

It really is easy to make. Essential it simply is chopping up the veggies, adding a little bit of salt, stuffing them in a jar and waiting. I assure you, once you make your own, you will never look back.

Fermenting veggies requires no special equipment or expertise. So let’s gather the ingredients and make some…

Essentially what you need are some vegetables (cabbage, carrots, some garlic, onions and salt)

Materials

  • a cutting board for chopping the vegetables
  • Knife for shredding your veggies
  • if you like you can use a grater
  • a big bowl for mixing up your veggies after chopping them
  • a source for your fermentation i.e a jar that you find in your kitchen (mason jar works well)

Ingredients

  • 1/2 cabbage head
  • 4 carrots
  • 1 onion
  • a clove of garlic
  • sea salt (do not use iodized salt)

Here we go, let us get started…

The first thing we need to do is chop the washed cabbage, onions, garlic and grate the carrots. This increases the vegetables surfaces area.

shred em'

shred em’

With the vegetables on the bowl, lightly sprinkle salt on them. The key is to sprinkle the salt lightly, because at the end we will mix it all together and taste it.

I like to use colored vegetables like beets and carrots because it makes the fermented vegetables more appeasing to the eye and of-course the colors bring different nutrients in the food, so don’t be afraid to use colored veggies.

Then mix the vegetables. As you mix them, squeeze them too. What squeezing does is it breaks the vegetables’ cell wall. The cells hold their juices in but we want them to release their juices, so that the vegetables can be submerged in them. Mix the vegetables and squeeze them and as you do this for a couple of minutes, you will notice that they start to get wet 🙂

Once the juices have come out of the vegetables, it’s time to pack them into a vessel. Probably the easiest vessel you will have at home is a glass jar but a ceramic pot works perfectly well. Material to avoid is metal because the salt and lactic acid will corrode it. Also do not use plastic because the chemicals in the plastics will leach out of them and into the fermented veggies over time.

With your hand pack the vegetables tightly into the jar. What we need to ensure is that the brine submerges the vegetables.

Things to remember

Check periodically to make sure the fermented vegetables remain under brine- add water if necessary. It is very important to ensure the veggies remain submerged in brine.

If you are sealing the vegetables in a jar, be sure to release the pressure that will eventually build up. If you are using a ceramic pot, place a plate on top of the vegetables and a jug of water or other weight on top of the plate to keep the vegetables submerged. Drape a cloth over the top to keep flies away.

veggies packed in jar

veggies packed in jar

If surface mold develops, which is a very common problem, scrap them away. Remove any discolored vegetables, the vegetables underneath are still fine to eat.

Fermented vegetables are intrinsically safe because the acidic environments are inhospitable to food poisoning micro organisms.

How long to ferment your veggies?

How I do it is I taste the vegetables regularly. I try them after a few days and then again after a few more days. I finally found that on the fourth day they taste good. The cooler a place is the more time it takes to ferment them and a hot humid area takes much shorter to ferment. so taste them regularly after a few days and you will get how long you should ferment your vegetables.

fermented vegetables, ugali and eggs :)

fermented vegetables, ugali and eggs 🙂

I hope you are inspired to try and make your very own fermented vegetables and become a part of the fermentation revolution.

References

  • The Art of Fermentation: An In-Depth Exploration of Essential Concepts and Processes from Around the World by Sandor Ellix Katz
  • Wild Fermentation: The Flavor, Nutrition and Craft of Live Culture Foods by Sandor Ellix Katz

Leave a comment

Filed under fermented veggies, fermenting vegetables, saurkraut

Homemade Fermented Vegetables

My first fermented vegetables that included cabbage, onion, carrot, ginger and garlic. This is the third day of fermentation. Will taste it on the fourth day to see how it is. Can’t wait!

fermented veges

fermented veges

…and the day came to finally try my fermented veges, I am happy to say it turned out great! more than I had expected. It was crunchy with a tangy taste and had a strong fresh pleasant taste that you notice in fermented foods. I loved it and now that I have made my first, i will never look back.

lactofermented veges

lactofermented veges

The lactic acid process that naturally preserves vegetables is ripe with probiotic power. To name just a few of the good bacteria that are common to lactic acid preserved foods are; Lactobacillus acidophilus, L. bulgaricus, L. plantarum, L. caret, L. pentoaceticus, L brevis and L. thermophiles. There is a wide range of healthy bacteria responsible for these beautiful ferments, so you will find a product brimming with healthy probiotics that will help ensure good gut health. Because of antibiotic use, and even the chlorine in our water, the healthy bacteria in our systems are often beaten down. Including naturally fermented foods is an excellent way to rebuild healthy gut bacteria levels.

fermented vegetables, ugali and eggs which took me 5 min to whip up :)

fermented vegetables, ugali and eggs which took me 5 min to whip up 🙂

Why Ferment them?

Fermented vegetables is a good source of vitamin C, and a modest serving every day is a step in the right direction.

Most of us know that cabbage is an excellent food for helping prevent cancer. Fermenting it is an excellent way to enjoy cabbage. Beyond the normal benefits of cabbage, fermenting it has even more cancer-fighting powers. It has been found that through the fermentation process, isothiocyanates are produced that are found to prohibit the growth of cancer. Glucosinolates in fermented cabbage was also found to help activate the body’s natural antioxidant enzymes, and the flavonoids in it are helpful for protecting artery walls from oxidative damage. Many studies have concluded that fermented cabbage is an even better choice than raw cabbage for cancer-fighting properties.

It turns out that cabbage is an excellent source of vitamin U, which can help heal peptic ulcers. Raw cabbage juice has been shown to be an effective treatment for peptic ulcers, and raw fermented cabbage is another way to get your vitamin U. A serving of fermented cabbage could help keep peptic ulcers away!

Finally, I have some interesting observation that I noticed this morning after last night’s dinner. As long as I remember, Ive always had bloating and other gastrointestinal discomforts like inconsistent bowel movements, occasionally fluctuating between constipation and diarrhoea. So when I went to the loo and passed a complete stool without straining, I was obviously pleased and knew that my stomach health was right on track!

1 Comment

Filed under fermented veggies, fermenting vegetables

Sprinkle Baobab Powder on Fruit salad

Baobab powder is a true “superfood”, with unique functional health properties. It offers three times more anti-oxidants than blueberries and six times more potassium than a banana, more iron than red meat and twice as much calcium as a glass of milk. It also contains thiamin and vitamin B6 – all known to benefit general health.IMG-20150204-00155So when I sprinkled it on fruit salad, this is what i get…

fruit salad baobab powder

fruit salad with baobab powder

After a few seconds…

IMG-20150204-00158Yummy 🙂

Leave a comment

Filed under Baobab Fruit powder

Banana Jam with Baobab Fruit Powder

Ever since, I’ve always wanted to make jam but for some reason or the other I always pushed it aside. One big reason was the thought of it being a difficult thing to do. Back in the day, in my Food Science course, I remember us doing a class on jam and actually making jam. To say the truth, it was a disappointing experience because what I remember is endlessly boiling some concoction that included a little fruit, lots of filler material, preservatives, colors and other chemicals. I guess the main idea was to teach us to be able to work in a large food processing plant and to be conversant with the science of making commercial jams and the like. But the thing is, I just want to make some jam that I and my family will use, and maybe give out some to friends.

mango jam

mango jam

Making tasty jam is not so hard. It’s actually very easy and you can make it right in your kitchen. Am happy I finally made some jam this weekend. I read and watched some recipe’s online. I liked Titli’s recipe on making jam which was very simple and easy. I went ahead and tried it. It turned out so lovely and tasty, with more of the fruit and none of the additives that we were taught of in class. I did mango jam and it turned out surprisingly well. then on Sunday I was super excited about my success and went ahead and made banana jam with baobab fruit powder. It turned out so well that I haven’t stopped having a spoonful every now and then ever since.

banana jam with baobab fruit powder

can’t resist having it, the ever so tasty banana jam with baobab fruit powder.

How did I come to include the baobab powder into the banana jam? Purely by chance! I had always known that the baobab fruit powder has amazing health benefits and most importantly, it has abundantly high pectin levels which is important in making quality jam.  Getting pectin had always been a challenge because in Mombasa you just can’t walk into a supermarket and buy it in a sachet, I’ve looked for it everywhere; then suddenly I stumble on the fact that I can substitute the commercial pectin with the 100% natural organic baobab fruit powder(which is abundantly available in Mombasa) and will work as well as its counterpart or even better as it has the numerous health benefits, I was obviously excited.

IMG-20150203-00145

Banana baobab powder jam on toast brown bread

So I went to the market and bought the baobab powder, 8 ripe bananas and 1 fresh lemon and got down to making some banana jam. Making the jam was so easy, easier than making mango jam because the cooking time was so short. I think I used a total of 30 min in making the jam. It was that fast. The most satisfying thing is that it turned out so tasty and creamy, with the lovely banana flavor and the tangy baobab taste, just heavenly! I will certainly make more. One hint if you want to make tasty jam; make small batches, because in doing so you will use less cooking time and so you will have a jam that has the fruity qualities still in it.

100% natural organic baobab fruit powder available for USD23.00 per kilo  

Leave a comment

Filed under Baobab Fruit powder, Jam